Monday, March 19, 2012

Antiqued chalk paint end table - French ephemera graphic image

This week I am loving earth tones. Muted greens, greys, cement, stone...love it!

This was yet another one of my junky Hermanus finds! I love the scrolly detail and the cut outs on the side!!


Here is the finished table!
Sorry it did'nt photograph too well. I am still getting to know my new Canon camera!


I used a paint colour called City Fog by Plascon, a lovely muted grey. I mixed the paint with plaster of paris in powdered form to get the chalky appearance. I distressed the table in all places where it would naturally become worn over time. I transferred an image that was part of an 1890's invoice for a French Corset maker from The Graphics Fairy!! To finish it off, I used some wood stain in Mahogany and rubbed this all over to create that antiqued effect......and there ya go!!


e-voke...to create a -new!


Sunday, March 18, 2012

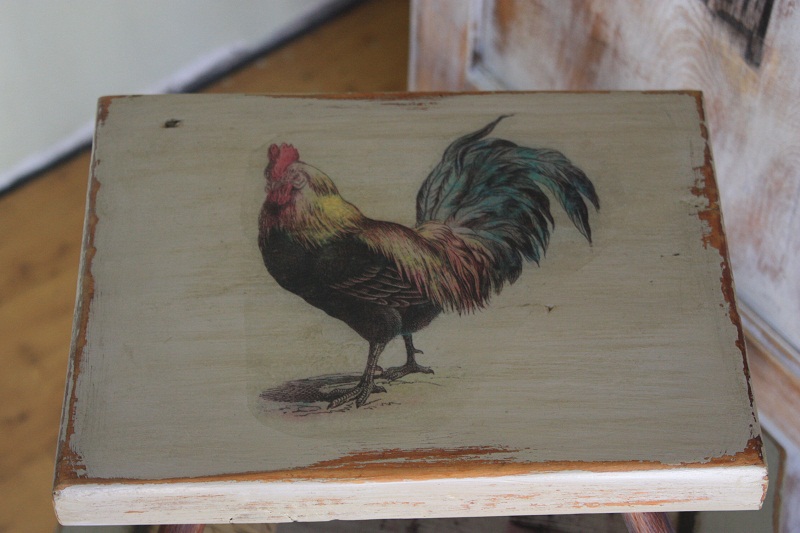
Little' est Milking Stool antiqued with Rooster graphic

Was she used to milk Bessie on the farm?

Another junky Hermanus find....Cutest!

Here she is before - plain Jane and downright sad!


Wow! Look at me now!


I went to work on the milking stool using a colour called Cement Wash by Plascon mixed with plaster of paris for that chalky paint effect! I then transferred this adorable colourful rooster using the Modge Podge method! This graphic is by Karen The Graphics Fairy. I am having so much fun using her stunning images and its free!
Anyhoo! I distressed this little stool in all the right places, added some ebony stain to those adorable pins and then mahogany wood stain for the antiqued effect!

Do you love her now!

I completed more great make overs using my chalk paint. I will post those later - right now I need some shut eye!

Blessings
Sumaya!


e-voke...to create a -new!


Antiqued Muted Green End Table with Glamour Girl Image

This week I am loving earth tones. Muted greens, greys, cement, stone...love it!

I wanted to try the chalk paint that is so popular now, but not available in South Africa.
So what's a girl to do?
Make her own chalk paint of course!

I went searching the net and stumbled across the talented Sherry's blog No Minimalist Here. I tried the plaster of paris method and I am so impressed with the result. Here is my first chalk paint 'Master piece' Hope you agree!

 I found this end table when I went junking in Hermanus and I love its octagonal shape but not the dark brown, boring colour.


 Here it is after I went to work on it!


This is a beautiful muted green colour called, Antique Linen by Plascon which I mixed with plaster of  paris in powdered form. I distressed the table in all places where it would naturally become worn over time. I transferred an image of the Glamour Girl beauty found on The Graphics Fairy. The transfer did not turn out as planned, so I had to dig deep and decided to frame her with a graphic of a wonderful poem entitled "Night" that is done in the loveliest penmanship handwriting - also by the Graphics Fairy! I then used some burnt umber to darken the edges using a moist cloth to blend it in and give it an uneven edge. Finally I used some wood stain in Mahogany and rubbed this all over to create that antiqued effect......Voila!

Where you stumble, there you might find your treasure!


e-voke...to create a -new!


Wednesday, March 14, 2012

Give thanks

Well, it is such a blessing when you can pass on one of your creations knowing that it will be well loved, and will create tons of new memories.

So it was double delight when I heard that my upcycled kiddie's chair was bought by a children's photographer. Anyone who works with little ones gets my vote!

So hop over to www.leandrephotographyblog.co.za to see her amazing work. Leandre shoots on location making it a fun and enjoyable session for both parent and tot. Leandre's style and unique images of kids make her a sought after children's photographer.

She truely captures the innocence and playfulness of youth. Just look at this adorable pic of the sweetest little girl perched on the chair -  there are lots more to drool over on Leandre's blog. So do pay her blog a visit. She will be delighted to welcome you!!!


Meet Miss A
 

e-voke...to create a -new!


Sunday, March 4, 2012

Shabby chic distressed kiddie's stepping stool makeover

What an adorable little stepping stool. Just imagine the joy it gave some little tot. When I found it, it was covered in layers of orangy-brown stain. Can you spot it in this pic?


I wanted to give it a fresher look, so I sanded it back and applied some primer. Then I gave it a few layers of my moody blue colour. I then used an amazing graphic of a French furniture company ad  which I found at the The Graphics Fairy. I used the modge podge method to transfer the image to the little stool. I find that I get better results when I let it sit overnight. So come morning I could'nt wait to see the result, so I got to work removing the paper. This takes time & patience folks!

When I was happy that all of the paper had come off, the little stool was ready for its shabby chic distressed look. I hand sanded all the edges and areas on the top. Finally I gave it a clear coat to protect its new look! Wow look at me now! I am saweet and I know it:)


And here is my little Einstein!!!!!


Ghanaan

e-voke...to create a -new!


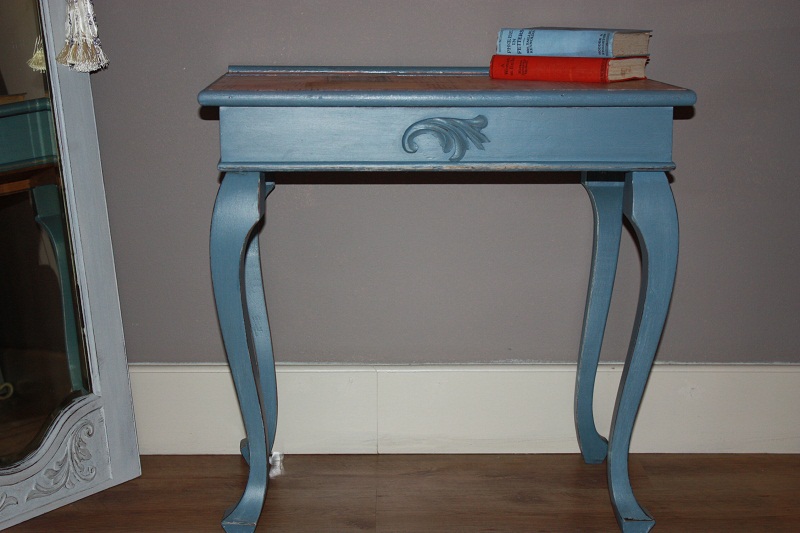
French inspired lady's writing desk makeover

Remember this old lady's writing desk I found during last week's treasure hunt? The top of the table is veneer which had quite a few dings. I first tried to repair it with wood putty, but I did not like the result.


Then I remembered that I had digital images of 1918 French documents and I knew it would be perfect for the top of this table. I sanded back the rest of the table and slapped on some all purpose primer. When the primer was dry, I gave this gal a few coats of moody blue colour. When the paint was dry, I started the decoupage of the table top using my 1918 French documents.

When I reviewed my handy work, I did'nt quite like the straight perfect lines (give me imperfect anyday!) so I tore some of the paper into strips, making sure I was getting a tattered edge. I then applied the tattered strips around the edges of the table top. I love the result!

Now, this gal was ready for some "distressment". I shaved some of the paint off in areas concentrating on the edges of the legs. I then remembered that I had an acanthus leaf applique, I attached it to the front with some 'No more nails' adhesive, then I gave it the same moody blue colour. Finally I applied antique glaze, rubbing off any excess as I went along. Now she is perfect ((*_*))


e-voke...to create a -new!

Saturday, March 3, 2012

Just a lazy Saturday!

I have no finished projects to share with you today:(.....had a hectic week at the office and although the inspiration was bubbling, the old bones just would not play along....LOL. But I do have some terrific news to share with you. After a long drought, hubby caught his first beeg fish....YAY!!!! He is in Struisbaai for the weekend and very excited with his catch!

Struisbaai is a coastal village boasting with the longest continuous stretch of white sand coastline in the Southern Hemisphere. It is an old, quiant fishing village still relatively untouched. Holiday makers mainly flock to Struisbaai for the water sport, long stretch of white sandy beach and of course fishing for Steenbras, Bellman and Cob.


The smile tells it all!


Little whitewashed fishermen's house


Lighthouse


Harbour

e-voke...to create a -new!


01 09 10 11 12
Blogging tips